Working seriously with Claude Code pulled my CLI-based editor habit way up. The flow of “open a terminal from a GUI editor” flipped into “open everything from inside a terminal.”
This post covers the dotfiles that produce the screen above. It’s also about how the same environment moves to another machine: one git clone, one bash setup.sh, done.
The deeper Claude Code configuration — skills, agents, hooks, MCP — will be covered in separate posts, so I only touch it lightly here.
Stack
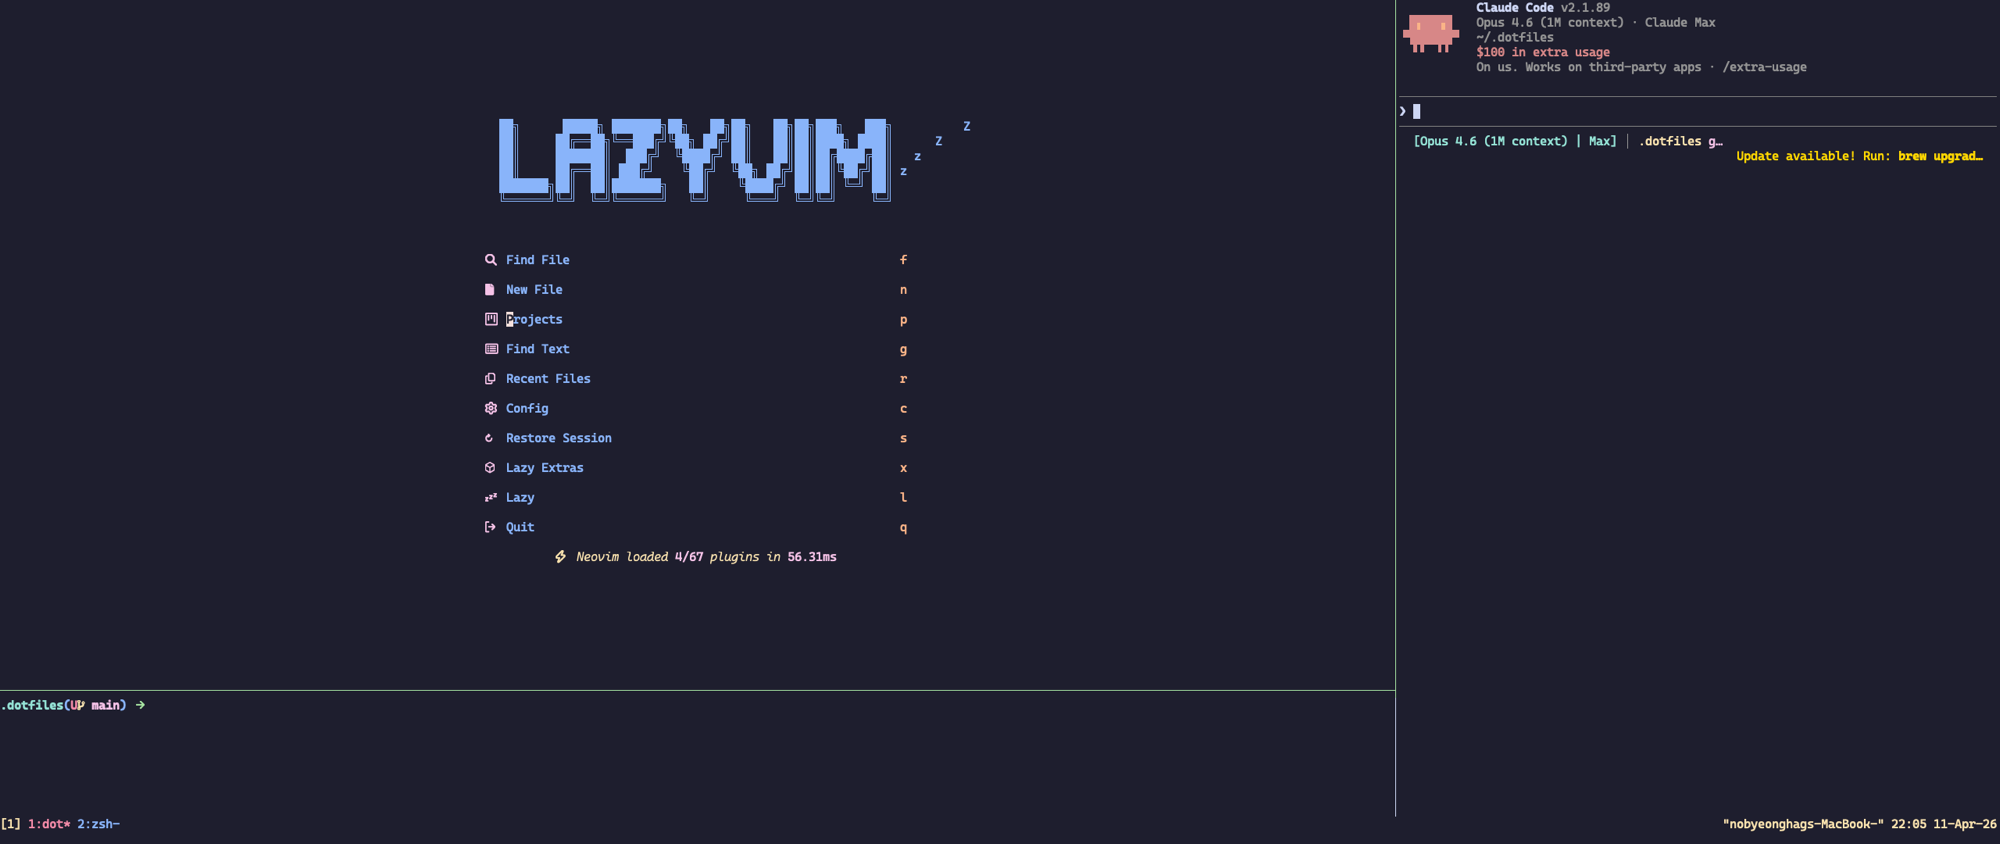
The terminal emulator is alacritty. tmux splits the screen into three inside an alacritty window. zsh runs as the shell in each pane. The editor in the top-left pane is nvim on a LazyVim base, and Claude Code runs as an AI pair in the right 30% pane.
| Tool | Role |
|---|---|
| alacritty | terminal emulator |
| tmux | session/window/pane multiplexer |
| zsh | shell |
| nvim (LazyVim) | editor (top-left pane) |
| Claude Code | AI pair (right 30% pane) |
This post walks through them in that order — alacritty, tmux, zsh, nvim, Claude Code — covering what each does and why it was chosen.
alacritty
alacritty is a cross-platform, GPU-accelerated terminal emulator written in Rust. It keeps its own feature set minimal, delegating splits and session management to other tools.
I picked alacritty as the terminal emulator. Three reasons.
- GPU rendering — OpenGL-based rendering, so input latency stays low.
- Config-as-code — every setting lives in a single
alacritty.toml. No hunting around for where things were saved. - Simplicity — alacritty intentionally omits tabs, splits, and sessions. That space is for tmux to fill.
The last point is the key one. By delegating splits and sessions to tmux instead of letting alacritty own them, the same abstraction works identically on macOS and Linux. The simpler the layer below, the more portable the layer above — that’s how I saw it.
The default shipped config is nearly empty. Colors, fonts, window decorations — until the user fills them in, alacritty is as close as it gets to a “raw terminal.” That empty state is where config-as-code begins.
My customizations are simple. Window decorations turned off to hide the macOS title bar. Padding removed so no pixel is wasted. The font set to a nerd font variant so nvim’s devicons render. Colors set to catppuccin mocha, written directly into the toml. No external yml, no includes — one file, done.
The keybindings translate Cmd key combinations into ESC sequences.
[keyboard]
bindings = [
  { chars = "\u001Bh", key = "H", mods = "Command" },
  { chars = "\u001Bl", key = "L", mods = "Command" },
  { chars = "\u001Bw", key = "W", mods = "Command" },
]
There is one macOS-specific issue. Cmd+H gets intercepted at the OS menu level as “Hide Application.” That key is supposed to be translated by alacritty’s keybindings into ESC+h (vim’s M-h) and forwarded to nvim, but if AppKit consumes it first, the translation never happens. That is why setup-macos.sh adds one extra line at the end.
defaults write org.alacritty NSUserKeyEquivalents -dict-add "Hide Alacritty" ""
That single line is what makes alacritty’s nvim integration work on macOS. The config file cannot solve this problem, so the decision lives in the setup script.
tmux
tmux is a terminal multiplexer. It manages multiple sessions, windows, and panes inside a single terminal, and keeps processes alive even after detaching.
Splitting the screen on top of alacritty is tmux’s job. That’s why alacritty has no tabs; tmux’s sessions / windows / panes fill that role instead.
The config stays close to defaults. The prefix stays at C-b (C-a collides with readline’s line-start and interferes in the shell). Copy mode runs on vim keys, and the ESC delay between nvim and tmux is removed. That last setting is small but nvim users notice the difference immediately.
tmux waits briefly after receiving ESC to decide whether it starts a prefix or meta sequence. set -gs escape-time 0 removes that wait, and mode switches in nvim happen instantly.
Two keybinding decisions are directly relevant. The shortcut that opens a Claude Code pane on the right, and the shortcut that normalizes that layout in one key. The nc function described below is a higher-level tool that combines these splits into a single function call.
bind i split-window -fh -p 30 -c "#{pane_current_path}" "claude"
bind o split-window -v -l 15% -c "#{pane_current_path}"
prefix i creates a Claude Code pane on the right; prefix o creates a shell pane at the bottom. These are the manual equivalents of what nc automates.
Another important decision is unifying pane navigation between vim and tmux behind the same keys. Pressing C-h/j/k/l without prefix, nvim moves to its left split if focused, or tmux moves to the left pane if in a shell pane. The tmux side checks whether the current pane is running a vim-family process and branches automatically. The boundary between tools disappears. No prefix key is needed to move between three panes.
is_vim="ps -o state= -o comm= -t '#{pane_tty}' \
    | grep -iqE '^[^TXZ ]+ +(\\S+\\/)?g?(view|n?vim?x?)(diff)?$'"
bind-key -n 'C-h' if-shell "$is_vim" 'send-keys C-h' 'select-pane -L'
bind-key -n 'C-j' if-shell "$is_vim" 'send-keys C-j' 'select-pane -D'
bind-key -n 'C-k' if-shell "$is_vim" 'send-keys C-k' 'select-pane -U'
bind-key -n 'C-l' if-shell "$is_vim" 'send-keys C-l' 'select-pane -R'
is_vim inspects the pane’s process. If a vim-family editor is running, the keystroke goes to nvim; otherwise tmux handles the pane switch.
zsh
zsh is a Bash-compatible shell with strong completion, extended globbing, and a plugin ecosystem. It has been the default shell on macOS since Catalina.
zsh has two halves. A .zshrc that handles PATH and environment, and an aliases.zsh that holds functions and aliases. ZDOTDIR points at ~/.config/zsh, and .zshrc sources every *.zsh in that directory.
ZDOTDIR=$HOME/.config/zsh

for _zsh_conf in $ZDOTDIR/*.zsh(N); do
  source "$_zsh_conf"
done
Thanks to this pattern, I can split aliases / functions / plugin configuration into separate files. New function? Drop a new .zsh file. .zshrc itself almost never gets touched.
The nc function is defined as follows.
function nc() {
  if [[ -z "$TMUX" ]]; then
    echo "Not inside a tmux session. Run from within tmux."
    return 1
  fi

  local target="${1:-$PWD}"
  local dir
  if [[ -d "$target" ]]; then
    dir="$(realpath "$target")"
  else
    dir="$(realpath "$(dirname "$target")")"
  fi

  local nvim_pane
  nvim_pane="$(tmux display-message -p '#{pane_id}')"

  tmux split-window -h -c "$dir" -l 30% "claude; exec $SHELL"

  tmux select-pane -L
  tmux split-window -v -c "$dir" -l 15%

  tmux select-pane -t "$nvim_pane"
  nvim "$@"
}
Line by line.
The first guard checks we’re inside tmux. Calling nc outside tmux is meaningless since the splits have nowhere to go. Print one line, return 1.
Next is deciding the working directory. No argument means $PWD. If the target is a directory, use it as-is; if it’s a file, use its parent. realpath makes it absolute. This dir becomes the cwd for all three panes. Open a file in nvim and run git status in the side pane and you’ll see the same repo.
Then, save the current pane’s ID. Focus needs to come back to nvim after the splits, but pane ids shift mid-split, so we grab it ahead of time.
Now the actual two splits.
First — tmux split-window -h -c "$dir" -l 30% "claude; exec $SHELL" creates a 30%-wide pane on the right and runs claude in it. The exec $SHELL switches the pane to a shell after claude exits, so it does not close immediately.
Second — tmux select-pane -L jumps back to the left (the original nvim slot), and tmux split-window -v -c "$dir" -l 15% cuts that left side top and bottom. The bottom 15% becomes a small terminal pane.
Finally, launch nvim. Move focus back to the saved nvim_pane (now the top-left) and run nvim "$@". If the argument is a file, that file opens; if it’s a directory, LazyVim’s dashboard appears.
The result is this layout, produced by a single nc call.
┌───────────────────────────┬──────────────┐
│                           │              │
│         nvim              │   claude     │
│       (LazyVim)           │   (30%)      │
│                           │              │
├───────────────────────────┤              │
│   shell (15%)             │              │
└───────────────────────────┴──────────────┘
A few helper aliases wrap this function.
alias zrc="nc ~/.config/zsh/"
alias nvimrc="nc ~/.config/nvim/"
alias alc="nc ~/.config/alacritty/"
alias tlc="nc ~/.tmux.conf"
So one zrc opens the zsh config directory in nvim with Claude Code already sitting in the side pane. Edit a config file, get a review in the next pane over.
Other aliases include f (pick a file via fzf and open in nvim), g (lazygit), ?? (fabric-ai), ? (w3m search). nc is the center of this post because one function defines where five tools are placed, all at once.
nvim
Neovim is a refactored fork of Vim, adding asynchronous plugins, a built-in LSP client, and Lua-based configuration. LazyVim is a configuration framework on top, providing sensible defaults and a modular extras system.
The editor is nvim on a LazyVim base. Instead of writing init.lua from scratch, I chose to inherit LazyVim’s reasonable defaults. LSP, treesitter, finder, mason-based LSP installation — all wired up out of the box; building the same thing by hand takes days. And because language extras toggle line-by-line inside lazyvim.json, adding a new language is one line plus :Lazy sync, which installs LSP / treesitter / formatter in one shot. Currently 32 extras are active, covering 14 languages alongside coding, editor, formatting, and test tooling.
Customization splits into two places. lua/config/* is where I override LazyVim’s defaults (keymap, option, autocmd overrides); lua/plugins/* is where new plugins or extra options for LazyVim extras land. Per-language settings are bundled into a single plugins/language/<lang>.lua. Removing go support means deleting that one file.
lua/plugins/language/
├── go.lua
├── html.lua
├── java.lua
├── markdown.lua
└── typescript.lua
I won’t go deeper into nvim itself. Keymaps, LSP configuration, debugger integration, snacks.nvim picker, harpoon2 workflow are each a separate post. This post’s scope ends at “the pattern of building modules on a LazyVim base.”
Claude Code
The right 30% pane belongs to Claude Code. It installs through one brew cask line (cask "claude-code"), and nc creates its position. Its role on the screen is simple: while you edit on the left, it pairs with you on the right with the same directory in context.
The dotfiles claude/ module actually carries more. settings, agents, hooks, rules, skills all get stowed under ~/.claude/, and they tune Claude Code’s behavior in fine grain. agents handle task delegation, hooks handle automation at file-save time, skills hold reusable workflows, rules hold per-language and shared code conventions.
But this post’s slot ends at “five tools in one screen.” Each Claude Code component — settings, agents, hooks, skills, MCP, output styles — will be covered in separate posts.
The one thing to take away from this post is simple. Claude Code runs in the right 30% pane that nc creates. Nothing more, nothing less. The layout starts the tool; the tool operates within the layout.
Limits and Trade-offs
A few cases where this setup doesn’t fit.
Work that depends on a GUI debugger. If browser devtools or a heavyweight IDE’s visual debugger is your daily tool, a terminal-centric layout will keep pulling you between two worlds. This setup rests on the assumption that code editing + shell + AI pair cover 99% of the work.
Pair programming over screen share. When you show your screen to a colleague, the intent behind nvim keybindings often doesn’t read. Seeing dd delete a line can be confusing for viewers unfamiliar with vim. If pair programming is frequent, a GUI editor has a lower communication cost.
Differences from the Linux setup. The same dotfiles work on Linux too, but the parts this post doesn’t cover — Hyprland window manager, Kime input method, Linux-specific packages — are separate. On macOS, alacritty handles the terminal emulator role; on Linux, Hyprland takes part of it.
The missing pieces, called out honestly. The input method (kime), the window manager (hypr), the keymapper (karabiner) — they fall outside this post’s scope, and I left them out. Input method choice does ultimately matter for Korean-speaking developers, but I judged that to be a separate post.
Bootstrap
The bootstrap has two phases. OS-specific package installation and stow-based dotfile symlinks.
The entry point is setup.sh. It branches on uname -s and sources either setup-macos.sh or setup-linux.sh. On macOS, the order goes like this.
- Xcode Command Line Tools — install if missing, otherwise pass.
- Homebrew — install via the official script if missing, otherwise pass.
brew bundle— installs everything inBrewfilein one shot. alacritty, tmux, neovim, the zsh plugin manager (zinit), search tools like fzf/fd/ripgrep/zoxide, lazygit, gh, claude-code — all together.- alacritty
defaults write— clears theNSUserKeyEquivalentsentry so macOS doesn’t interceptCmd+Hat the AppKit menu level. This is what lets alacritty receiveCmd+Hand translate it into vim’sM-h.
Once OS-specific install is done, control returns to setup.sh proper. There, GNU stow symlinks the dotfiles, module by module.
COMMON_MODULES=(claude git lazygit nvim tmux obsidian zsh)
for m in $COMMON_MODULES; do
  stow --restow "$m"
done
Each module directory has the shape <module>/.config/<tool>/.... For example, nvim/.config/nvim/init.lua gets symlinked by stow to ~/.config/nvim/init.lua. It follows the XDG_CONFIG_HOME convention directly, which makes adding or removing a module a clean per-directory operation.
On macOS, alacritty and karabiner are stowed in addition, and finally a second-brain Obsidian vault is cloned and registered as obsidian-cli’s default vault. After those two phases, one exec zsh activates the full configuration.
Closing
Starting from where we began: one nc call, a screen split into three, five tools each handling their role. Behind that call is a dotfiles repo that reproduces with one bash setup.sh. The repo is a set of decisions about what role alacritty / tmux / zsh / nvim / Claude Code each play.
The repository is here.
git clone https://github.com/byunghak/.dotfiles.git ~/.dotfiles
cd ~/.dotfiles && bash setup.sh
Two lines to move the same environment to a new machine.
Follow-up posts will cover Claude Code’s internals (settings, agents, hooks, skills, MCP) one at a time. If this post covered the layout itself, the next ones cover the decisions within each tool.